Python monitoring isn’t just about watching your application crash. It’s about knowing why it crashes, when it slows down, and what exact line of code is eating your CPU. Python, for all its developer friendliness, hides some nasty performance traps. The Global Interpreter Lock (GIL) can turn parallel code into a sequential slog. Dynamic typing means type checks happen at runtime, not ahead of time. You don’t get those C++ compiler warnings. You get a production incident at 2 AM.
This guide walks through real practices. No theory lectures. You’ll learn which metrics matter, which tools actually work, and how to stop chasing ghosts in your stack traces.
What is Python Performance Monitoring
Performance monitoring is the systematic collection of runtime data from your Python application. This data answers three questions: Is it fast enough? Is it stable? Is it getting worse? You measure things like request latency, memory consumption, and error frequency. Then you compare those numbers against your service level objectives.
Python adds unique challenges here. Interpreted execution means every line of Python code runs inside a virtual machine, not directly on hardware. That abstraction layer creates overhead. The GIL prevents true parallelism for CPU-bound threads. Your four‑core server might only use one core for Python threads unless you use multiprocessing. Monitoring must account for these quirks.
You can’t just graph CPU usage and call it done. Python monitoring digs into Python bytecode execution counts, garbage collection pauses, and lock contention. A sampling profiler like py-spy attaches to a running Python process without modifying code. It shows you functions consuming time, even those deep in third‑party libraries. That’s monitoring. Not guesswork.
Why Python Performance Monitoring Is Important
Slow Python code loses money. An e‑commerce application with 200 ms average response time might see a 1% conversion drop for every 100 ms added. That’s real revenue. But speed isn’t everything. Memory leaks in a data processing pipeline can crash your server after processing 10,000 records. The first 9,999 worked fine. The 10,000th triggered an out‑of‑memory kill.
Monitoring gives you early warnings. You catch the memory leak when heap size grows 5% per hour, not when Kubernetes kills the pod. You spot the N+1 database query when response time p95 jumps from 80 ms to 400 ms after a code deployment. Without monitoring, you’re debugging blindfolded.
SREs and DevOps engineers use monitoring data to set alerting rules. “Error rate > 1% for five minutes” triggers a page. “P99 latency > 500 ms” creates a ticket. These thresholds come from observed behavior, not random numbers. Monitoring turns vague “slowness” complaints into actionable metrics.
There’s a compliance angle too. Financial and healthcare applications need audit trails. Python monitoring logs can prove you met response time guarantees or processed every transaction. When something fails, you have the stack traces, the memory snapshots, the database query timings. That’s evidence, not excuses.
6 Essential Python Performance Metrics
You can’t monitor everything. Focus on metrics that actually break systems. Here’s the short list:
- CPU usage: Percentage of time your Python process spends on the CPU. Watch for sustained 80%+ on a single core. That’s a CPU bottleneck. Use psutil to collect this from inside your app;
- Memory: Track heap size, garbage collection frequency, and object counts. Python’s memory management uses reference counting plus a generational garbage collector. tracemalloc shows you which lines of code allocated memory. gc module lets you monitor collection pauses. Memory leaks often hide in circular references or caches that never expire;
- Response time: Measure average, p95, and p99. P99 matters most. If your average is 100 ms but p99 is 5 seconds, 1% of users have a terrible experience. That’s usually a slow database query or lock contention;
- Throughput: Requests per second your application handles. Watch for drops. A throughput decrease with constant request volume means something is blocking. Maybe the GIL is causing contention. Maybe you exhausted your connection pool.
- Error rates: Count exceptions and collect stack traces. Python makes this easy with sys.excepthook. But exceptions are expensive. Raising an exception costs microseconds of CPU time. High error rates can kill performance even if your code handles them;
- Custom business metrics: These depend on your domain. An e‑commerce app tracks cart abandonment rates. A data pipeline tracks records processed per minute. A microservice tracks cache hit ratio. prometheus_client exports these easily.
6 Python Performance Monitoring Best Practices
The following best practices will help you replace bad habits with reliable techniques, allowing you to stop guessing and start fixing real problems before they escalate into full outages.
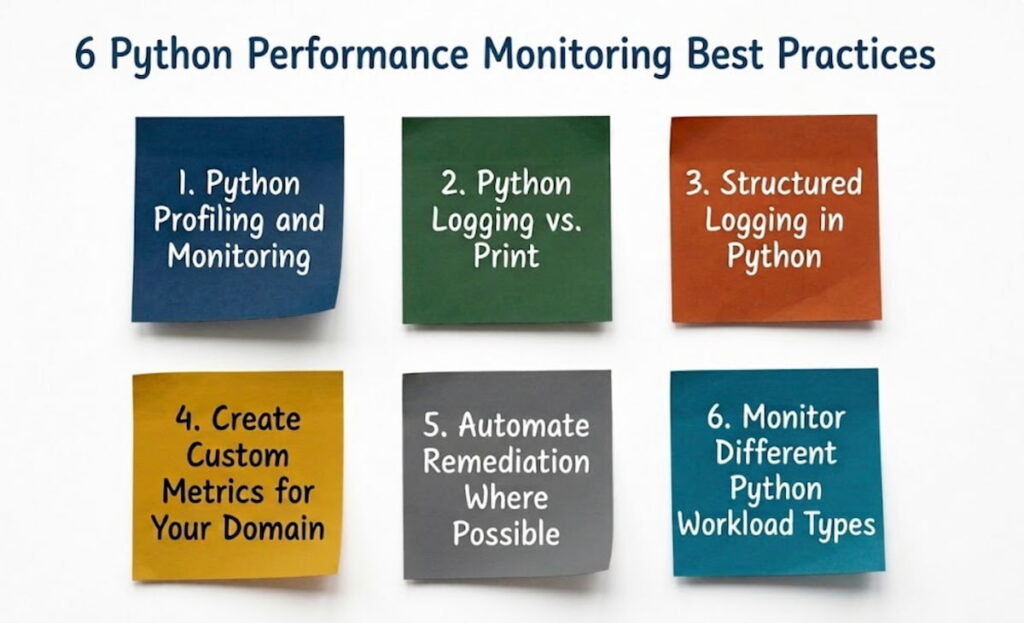
1. Python Profiling and Monitoring
Profiling answers “which functions consume time?” Production profiling needs a sampling profiler like py-spy. It interrupts the Python interpreter every few milliseconds and records the current call stack. Over thousands of samples, you get a statistical picture of where time goes. Overhead is low because you’re not tracing every function call.
Compare this with tracing profilers like cProfile. cProfile instruments every function entry and exit. It’s accurate but adds 10‑50% overhead. Great for staging. Too heavy for production.
Sampling works even with the GIL. When a thread waits for the GIL, py-spy sees that as time spent in _PyEval_EvalFrameDefault. You can identify lock contention this way. For web services using Django or Flask, you’ll often find the GIL becomes a bottleneck under high concurrency. Moving CPU‑intensive work to subprocesses helps. Or use FastAPI with async endpoints to handle I/O while waiting.
Real example: A FastAPI microservice showed 80% CPU usage with only 200 requests/second. Py‑spy revealed 45% of samples inside json.loads() for a 2 MB payload. Fix: compressed the payload and used orjson (a faster JSON library). CPU dropped to 20%.
2. Python Logging vs. Print
Print statements go to stdout. They’re fine for scripts. But for production python monitoring, use the logging module. Reasons: log levels (DEBUG, INFO, WARNING, ERROR), automatic timestamps, configurable handlers, and structured output.
Print blocks. Each print() call acquires the stdout lock. In a multithreaded app, threads compete for that lock. Logging with a QueueHandler offloads the I/O to a background thread. Your request thread doesn’t wait for disk writes.
Print lacks context. You get a message but no idea which request produced it. Logging gives you %(filename)s:%(lineno)d and %(process)d. Add trace IDs from distributed tracing (OpenTelemetry) to correlate logs across microservices.
Exception handling: logging.exception() automatically includes the stack trace. Print requires traceback.print_exc(). One is standard. The other is extra code you’ll forget.
3. Structured Logging in Python
Plain text logs are grep‑able but not queryable. Structured logging outputs JSON. Each log line is a dictionary with keys like timestamp, level, message, user_id, duration_ms. Tools like Loki or Elasticsearch index these fields. You can then ask “show me all errors for user 12345 in the last hour.”
The python-json-logger library does this. Or use structlog. Example output:
json
{“event”: “Database query slow”, “duration_ms”: 2500, “query”: “SELECT * FROM orders”, “level”: “warning”, “timestamp”: “2025-03-15T10:30:00Z”}
Parse that with jq on the command line. Feed it into Prometheus + Grafana for dashboards. Jaeger can correlate structured logs with traces. One request ID flows through logs, metrics, and traces. Debugging becomes cohesive without using that banned word.
Structured logging shines for data science workloads. Log model accuracy, feature importance, prediction latency. These become metrics you can graph over time. See when model performance degrades after a data pipeline change.
4. Create Custom Metrics for Your Domain
Library tools measure CPU and memory. They don’t measure “user signups per minute” or “average search latency.” You need custom business metrics. prometheus_client makes this straightforward.
Define a Counter for events: signups = Counter(‘user_signups_total’, ‘Total user registrations’). Increment it after each successful signup. Define a Histogram for durations: search_latency = Histogram(‘search_duration_seconds’, ‘Search request latency’). Measure the time from request to response.
For data processing pipelines, track records processed, bytes read, errors per batch. For web services, track active sessions, cache hit ratio, external API call durations. Export these metrics on a /metrics endpoint. Prometheus scrapes every 15 seconds. Grafana visualizes.
Last9 or similar tools can aggregate custom metrics across hundreds of services. See global signup rates, not just per‑pod rates. This matters for microservices where one request touches 10 different services.
5. Automate Remediation Where Possible
Metrics without automation are just expensive dashboards. Set up automated remediation for common failure modes.
Example: Memory leak detected via tracemalloc growing 10% per hour. Trigger a Kubernetes readiness probe failure. The pod stops receiving traffic, restarts, and recovers. Users see no error. Or use a webhook to restart the container via Docker SDK for Python.
Another: Connection pool exhaustion in psycopg2. If active connections exceed 90% of pool size, dynamically increase pool size up to a limit. Or reject non‑critical requests with HTTP 503 instead of letting them wait forever.
Automation saves SREs from 3 AM pages. But start simple. Automate reboots first. Then connection pool tuning. Then complex workflows like scaling up additional pods. Use Python scripts that watch Prometheus alerts and call Kubernetes APIs.
6. Monitor Different Python Workload Types
- Web services (Django, Flask, FastAPI): Focus on response time, error rate, request rate. Profile endpoints individually. Slow database queries are the top culprit. Use connection pooling and query caching. Monitor active connections to Postgres or Redis;
- Data processing pipelines: Throughput (records/second) and memory dominate. Watch for garbage collection frequency. Large object allocations trigger GC pauses. Use weakref for caches so objects can be freed. Monitor disk I/O if you write intermediate results;
- Data science & ML workloads: Model inference latency, GPU memory, prediction distribution. Python’s dynamic typing hurts here. A malformed input can trigger unexpected type conversions that consume milliseconds. Validate inputs early. Use batching to amortize Python overhead;
- Serverless functions (AWS Lambda, Google Cloud Functions): Cold start time matters. Python imports heavy libraries (TensorFlow, Pandas) and add seconds to startup. Keep dependencies minimal. Monitor execution time and memory. Function gets killed at the timeout limit, leaving no trace;
- E‑commerce applications: Custom metrics like cart size, checkout abandonment, inventory lookup latency. Black Friday traffic patterns are different from normal. Monitor at 10x normal load. Use locust or k6 for load testing combined with monitoring.
How to Implement Python Performance Monitoring Practices
Implementation follows stages. Don’t boil the ocean.
Stage 1: Local development
Add cProfile to your test suite. Profile every endpoint once per day. Fail CI if p95 latency increases by 20%. Use tracemalloc to catch memory leaks in unit tests. gc module can verify object counts return to zero after each test.
Stage 2: Staging environment
Deploy with OpenTelemetry instrumentation. The opentelemetry-api and opentelemetry-sdk auto‑instrument popular libraries (Django, Flask, requests, psycopg2). Send traces to Jaeger. Export metrics to Prometheus + Grafana. Run load tests. Record baseline metrics.
Stage 3: Production rollout
Start with py-spy as a sidecar container. It attaches to your Python process without code changes. Export metrics via prometheus_client. Use psutil to collect system metrics (open files, context switches). Send logs with structured logging to Elasticsearch or Loki.
Stage 4: Alerting and automation
Define SLOs: 99.9% of requests under 500 ms. Error budget is 0.1% of total requests per month. Alert when error rate exceeds that in 1 hour. Automate remediation: restart memory‑leaking pods, increase connection pool size, page on‑call only when automation fails.
Use distributed tracing for microservices. Jaeger shows you the exact database query or API call that slowed your request. Without tracing, you guess. With tracing, you point at the slow function and fix it.
Tool selection quick reference:
- cProfile + snakeviz: local profiling;
- py-spy: production profiling without restart;
- tracemalloc: memory allocation tracking;
- prometheus_client: metrics export;
- opentelemetry-sdk: distributed tracing;
- psutil: system metrics;
- Sentry: exception tracking and stack traces;
- Docker + Kubernetes: deployment and scaling.
The difference between good and bad python monitoring is actionability. A dashboard of 50 graphs is useless if no one watches it. Turn metrics into alerts. Turn alerts into tickets. Turn tickets into code changes. That loop closes the gap between “it’s slow” and “it’s fixed.